1000+ 5-STAR REVIEWS


Recommended All Over Florida
If you’ve discovered mold in your home, addressing it promptly is essential to protect your health and property. For minor infestations, DIY mold remediation can be an effective and affordable solution when done safely. By following proper precautions and using the right products, you can remove mold efficiently without causing further spread or damage.
In this guide, we’ll walk you through step-by-step instructions for safe DIY mold remediation at home. We’ll also highlight the best mold removal products to ensure thorough cleaning and long-lasting results, helping you maintain a healthy, mold-free living environment.
When it comes to mold, it’s important to understand the potential dangers and why it’s crucial to clean it up promptly. Mold cleanup at home is necessary to prevent further damage to your health and property. Mold spores can be harmful and cause respiratory problems and other health issues. Symptoms of mold exposure include coughing, sneezing, wheezing, eye irritation, and skin rashes.
Mold can grow anywhere with moisture and an organic material source, like walls, ceilings, carpets, and furniture. Cost-effective mold remediation requires identifying the cause of mold growth, stopping it, and removing the mold safely. By tackling mold issues early on, you can prevent the need for costly repairs and health complications.
Before starting DIY mold remediation, educate yourself about the risks and proper precautions to take. Our cost-effective mold remediation guide will help you safely and efficiently clean up mold in your home.
| Health Effects: | Symptoms: |
|---|---|
| Allergic reactions | Coughing, sneezing, runny nose, skin rash, eye irritation |
| Asthma | Wheezing, shortness of breath, chest tightness |
| Infections | Respiratory infections, sinus infections, skin infections |
| Toxic responses | Headaches, dizziness, memory loss, fatigue, nausea, and even death |
The most cost-effective mold remediation method is to clean up mold growth yourself. However, for bigger jobs or if you have health issues, it’s best to seek professional mold cleanup at home services. Stay safe and keep your home mold-free by identifying the problem and finding a solution that’s right for you.
Identifying the extent of the mold issue is a crucial step before starting the DIY mold removal process. Conducting a DIY mold test can help you determine the severity of the problem and determine the best approach for remediation.
The easiest way to detect mold growth is through visual inspection. Look out for signs of mold, including visible mold growth, water damage, musty odors, and discoloration on surfaces. If you suspect mold growth behind walls or in hidden areas, use a moisture meter to detect any dampness.
It’s also important to note that not all mold is visible or has a strong odor. Therefore, conducting a DIY mold test is the most effective way to identify all areas of mold growth accurately.
| Type of Mold Test | Cost | Method |
|---|---|---|
| Air Quality Mold Test | $50-$200 | Collects air samples to test for mold spores. |
| Surface Mold Test | $10-$50 | Collects samples of suspected mold growth on surfaces for laboratory analysis. |
| Do-It-Yourself Mold Test | $10-$40 | Uses a test kit from a local hardware store or online retailer to detect mold growth. |
DIY mold testing kits come with instructions on how to collect and send samples to a laboratory for analysis. Most kits use a swab, tape, or petri dish to collect samples.
Remember, although DIY mold testing is a useful tool for detecting mold, it’s still recommended to seek professional assistance in cases of significant mold growth or health concerns.
Before starting the DIY mold remediation process, it’s essential to gather the right tools and materials to ensure success. We recommend investing in the best DIY mold removal products available for optimal results.
Here are the essential tools you’ll need for DIY mold removal:
| Tool | Purpose |
|---|---|
| Gloves and eye protection | For personal protection against mold spores and cleaning agents |
| Respirator mask | To protect yourself when working with mold and chemicals |
| Scrub brush | To clean the affected areas of your home |
| Cleaning cloths | To wipe down surfaces and remove mold growth |
| Trash bags | To dispose of contaminated materials safely |
Here are the necessary materials you’ll need for DIY mold removal:
| Material | Purpose |
|---|---|
| Vinegar or hydrogen peroxide | To kill and remove mold growth |
| Baking soda | To absorb moisture and eliminate odor |
| Anti-mold spray | To prevent future mold growth |
| Dehumidifier | To regulate the humidity level in your home and prevent mold growth |
| Mold testing kit | To identify the extent of mold growth in your home |
Investing in the best DIY mold removal products and equipment is crucial to ensuring safe and effective remediation. With the right tools and materials, you can effectively remove mold growth and prevent future mold troubles.
Starting the DIY mold remediation process can be daunting, but taking necessary precautions can make the process smoother, safer, and more effective. Before you begin, ensure that you have gathered all the required equipment as per the previous section’s recommendations.
To protect yourself, wear personal protective equipment (PPE), such as gloves, respirators, and safety goggles, throughout the entire process to prevent inhaling harmful mold spores. Additionally, make sure to wear old clothes that you can dispose of afterward, so you don’t accidentally spread mold spores elsewhere in your home.
It’s also crucial to prepare the area to avoid future mold growth. Address any moisture issues, improve ventilation, and reduce humidity levels around the affected area. DIY mold prevention techniques like wiping down surfaces with white vinegar or tea tree oil can also help deter mold growth.
For natural mold remediation, consider using ingredients like baking soda, hydrogen peroxide, vinegar, or tea tree oil for effective mold cleanup. These natural solutions may not be as potent as chemical solutions, but they can be an eco-friendly alternative.
| Equipment | Function |
|---|---|
| Personal Protective Equipment (PPE) | Protects the user from mold exposure |
| HEPA Vacuum | Filters mold spores from the air |
| Scrub Brush | Removes mold from surfaces |
| Bucket | Stores cleaning solutions |
| Cleaning Solutions | Chemical or natural solutions for mold removal |
| Plastic Sheets | Creates containment barriers to limit mold spread |
| Fans or Dehumidifiers | Dries out the affected area to prevent mold regrowth |
Remember, mold remediation can be a time-consuming and demanding process. Don’t rush the process; instead, stay patient, and stay safe.
During DIY mold removal, containment and isolation are crucial to avoid the spread of mold spores to other areas, which could exacerbate the problem. To effectively contain and isolate the mold-infested area, follow these steps:
By following these steps, you can minimize the risk of cross-contamination during the DIY mold removal process, ensuring that the mold-infested area remains contained and isolated.
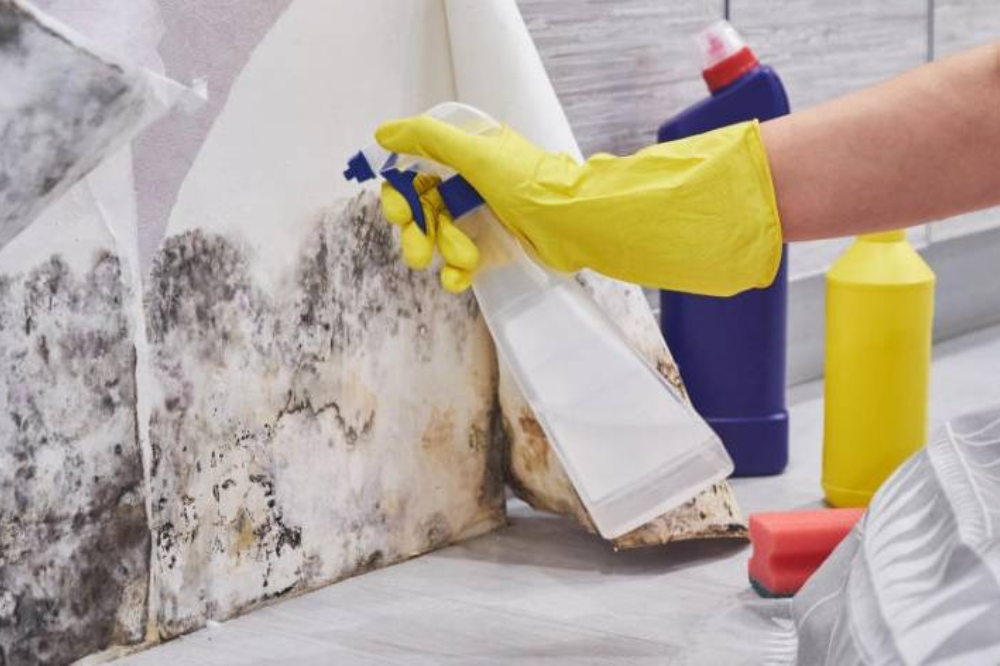
Removing mold from various surfaces in your home can be a daunting task. However, with the right approach, you can safely and effectively remove black mold on your own. The following DIY black mold removal techniques will help you get the job done:
Keep in mind that proper precautions must be taken to prevent mold from spreading during the removal process. Use plastic sheeting to block off the area you’re working on, and it’s also a good idea to seal off air vents and ducts to prevent the spread of mold spores to other areas of your home.

Remember, while DIY black mold removal can be an effective solution for small areas, larger infestations may require professional assistance. Don’t hesitate to seek help if you’re unsure about the extent of the mold problem or feel uncomfortable tackling it on your own.
Mold can grow inside air vents and HVAC systems, posing a threat to indoor air quality. During DIY mold remediation, it’s essential to clean these systems to prevent further contamination of your space. Here are some guidelines on how to effectively clean air vents and HVAC components:
Keeping your air vents and HVAC systems clean is crucial for maintaining healthy indoor air quality and preventing mold from thriving in your home.
Excess moisture is the primary cause of mold growth. To prevent mold from returning, it’s essential to address any moisture issues in your home. Drying and dehumidification are two essential steps in the DIY mold cleanup process.
The first step is to dry any affected areas thoroughly. Use fans and dehumidifiers to speed up the drying process. Be sure to dry surfaces completely, as mold can grow on leftover moisture.
The second step is to control the humidity levels in your home. A humidity level of 60% or higher can contribute to mold growth. Use a hygrometer to monitor humidity levels, and run a dehumidifier to maintain optimal levels below 50%. Empty the dehumidifier regularly and position it in the center of the room with good air circulation.
Remember, effective drying and dehumidification are essential in preventing mold regrowth in your home. For more information on DIY mold prevention, check out our section on Preparing Yourself and the Area.
Quickly drying any affected areas is essential to prevent the spread of mold throughout your home. If left untreated, mold can spread within 24-48 hours, causing further damage and health risks. By effectively drying the area, you can minimize the risk of mold spores spreading and avoid costly repairs.
After completing the DIY mold remediation process, conducting a final inspection is crucial to ensure that all mold has been effectively removed. Here are the steps to follow:
Once you’ve completed the inspection, it’s time to implement preventive measures to minimize the risk of future mold growth. Here are some DIY mold prevention strategies:
Remember, prevention is key when it comes to mold. By implementing these DIY mold prevention strategies, you can minimize the risk of future mold growth in your home.

DIY mold remediation can effectively address minor mold problems. However, there are instances where it’s best to seek professional assistance, particularly when mold contamination is extensive or you have underlying health conditions that increase your risk of mold exposure. Consider professional help if you:
Professional mold remediation services can provide you with the expertise and support you need for proper mold cleanup at home. However, choosing the right company can be overwhelming. Here are some factors to consider before hiring a mold remediation professional:
| Factors to Consider | Questions to Ask |
|---|---|
| License and Certification | Are they licensed, and do they have certifications in mold remediation? |
| Experience | How long have they been providing mold remediation services? |
| References | Can they provide references or testimonials from previous clients? |
| Pricing | Do they provide a detailed breakdown of pricing and services? |
| Insurance | Do they have liability insurance to cover potential damages? |
Remember that your health and safety are top priorities when dealing with mold. In some cases, professional assistance can be crucial to ensure effective mold cleanup at home. If in doubt, don’t hesitate to seek professional help.
DIY mold remediation can be a safe and cost-effective way to tackle minor mold problems at home. By following the proper steps, using protective equipment, and implementing preventive measures, you can effectively remove mold and reduce the risk of recurrence. For larger or more severe infestations, professional assistance is recommended. Staying vigilant, addressing moisture issues promptly, and maintaining a clean, dry environment are key to keeping your home mold-free. With these strategies, you can protect your family’s health and maintain a safe, healthy indoor space.
While small mold issues may seem manageable, larger or recurring problems require expert attention. FixMold offers reliable mold remediation services in Miami Lakes, ensuring mold is removed safely, thoroughly, and in compliance with industry standards.
Yes, you can remove mold yourself with the right knowledge and tools. However, it’s important to assess the extent of the mold problem and take necessary precautions to protect yourself during the removal process.
The steps for DIY mold remediation include assessing the mold problem, gathering the necessary tools and materials, preparing yourself and the area, containing and isolating the affected area, removing mold from surfaces, cleaning air vents and HVAC systems, drying and dehumidifying, conducting a final inspection, and implementing prevention strategies.
Mold can pose health risks, including allergic reactions, respiratory issues, and even infections. It’s important to address mold promptly to prevent any potential health problems.
You can conduct DIY mold testing using mold test kits available in the market. These kits typically include swabs or tape to collect samples, which can be sent to a laboratory for analysis.
Some of the best DIY mold removal products include hydrogen peroxide, vinegar, baking soda, borax, and commercial mold cleaners. It’s essential to choose products that are effective against mold and safe for the surfaces you’re cleaning.
To prevent mold growth, you should control humidity levels, fix any water leaks or moisture issues promptly, improve ventilation, and ensure proper insulation. Regular cleaning and maintenance can also help prevent mold growth.
To clean air vents and HVAC systems, you can use a vacuum cleaner with a HEPA filter, brushes, and disinfectants suitable for HVAC components. It’s important to follow manufacturer guidelines and consider professional cleaning for complex systems.
It’s advisable to seek professional assistance if the mold problem is extensive (covering a large area) or if you have underlying health conditions that could be exacerbated by mold exposure. Professional assistance may also be necessary if there is structural damage or hidden mold sources.
